for those of you who know me , you know that i LOVE to make and receive homemade gifts. i love making goodies for people and watching them open those gifts. i love making things for my children and seeing them wear it.
last year when i went part-time at work i started making even more gifts for my friends and family. like many of you know our life goes in cycles. right now i am in the "mommy cycle" so most of my friends are having babies, have just had babies or our kiddos play together.
do you remember the last post with sadie's lemonade stand? i made her shirt with the number 1 on it. (if you were here, you'd see my big proud grin)
to be honest, all those birthday parties and baby showers get crazy and expensive. that's when i decided a homemade and heartfelt gift was the way i wanted to go.... hence learning to applique.
 |
| this cute tie applied to a onesie is the perfect gift for a baby boy |
with a lot of trial and error and some research on the internet, i taught myself how to make appliques. you can applique any design. you can put them on onesies, t-shirts, bibs, aprons - on just about anything. i made a few (ok, A LOT) and learned as i went. now that i've done it so many times, i finally have a system in place and my work flows pretty easily. check it out and try one for yourself.
here are the items you will need to make your own applique:
- design or letter of your choice (simpler is better)
- pencil or pen for tracing
- iron
- fusible webbing (i use wonder under)
- cute cotton fabric
- t shirt, onesie or whatever items you want to applique onto
- thread
- scissors
**note: i wash, dry and lightly iron each piece of fabric and garment before i start this process.
set your iron to medium/high with no steam. iron the fusible webbing to the fabric you have chosen for this project. i use only the amount i need for the design to conserve my supplies. only rest your iron on the fusible webbing/fabric for about 8-10 seconds. and be careful not to slide the iron.
set your iron to medium/high with no steam. iron the fusible webbing to the fabric you have chosen for this project. i use only the amount i need for the design to conserve my supplies. only rest your iron on the fusible webbing/fabric for about 8-10 seconds. and be careful not to slide the iron.
 |
| the fusible webbing bonds to the fabric |
once you've selected a design, trace it onto the webbing-side of the paper that you have bonded to the fabric. cut out your design. ** this is the old school way of doing things. if you have a cri-cut die cut machine or a silhouette, this part will be much easier for you.
 |
| select your design. trace onto wonder under-backed fabric and cut out. |
when you have completely cut out your design, peel away the backing layer of the fusible webbing. your fabric should have a distinctive texture on the back of it. place your design wherever you like it on your clothing item- bonded side down. with the iron still set at medium/high and no steam, place the iron on top of the design for 8-10 seconds. lift the iron and repeat - set the iron on the remaining portion of the design for another 8-10 seconds. again, be careful not to slide the iron or your design may move and become wrinkled.
 |
| iron set to medium/high and NO steam |
the fusible webbing has bonded your design to the clothing item. however, if you're looking for a little bit a stronger hold you can sew around the edges of the design. i like to do this because that way i am confident the design won't peel off when i wash it and it looks super cute with some colorful stitching.
you can stitch by hand - the sloppier, the better sometimes - or use a sewing machine.
 |
| stitch around your design |
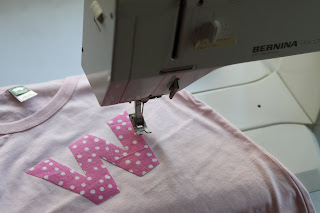
i use my grandmother's old sewing machine. i took it to a local vacuum cleaner and sewing machine repair place. the guy was great and gave it a tune-up at a decent price. when using the sewing machine, you can use a straight stitch or a zig zag stitch. either one is cute. if you're asking for my opinion, i prefer the straight stitch because it's easier to do and the finished product looks "cleaner." additionally, be careful that your clothing doesn't get all bunched up and you wind up sewing the front of the shirt to the back of the shirt.
yes, my name is amanda and i have done this.
 |
| see how the shirt is pulled up so that i'm only sewing on one layer. |
go around all sides of your design. when finished, snip your threads and there you go! wrap up your homemade goodies in a cute bag with a big bow. your friends will love them and you will feel good knowing you've made something from the heart for those whom you love.
let me know if you try this; i'd love to hear how it goes!
if you're not the martha stewart-type, then shoot me an email and i'd be happy to sew one of these beauties up for you at a very reasonable price!
 |
| just a few little goodies i'm working on right now |
Love it Amanda!!!! Keep up the AWESOME work!!!
ReplyDeleteOh my goodness...I'm so coming over the next time you do this so I can stand in the presence of your awesomeness! =)
ReplyDeleteThis comment has been removed by the author.
ReplyDeleteLove Your work!! Thanks for sharing!
ReplyDeleteHope to see you soon!